Saturday, July 15, 2017

My Reader's Workshop and Guided Reading Tips and Tricks


If you've ever wanted to implement Guided Reading in your classroom and wanted to know: "What are the other students doing in the classroom while I'm doing Guided Reading?" This is you're lucky day! I hope you will learn about some new ideas about how to mesh Reader's Workshop with Guided Reading and be excited to start it this coming school year! Here goes...

Balanced Literacy is a framework that has these components: Reader's Workshop, Writer's Workshop, Guided Reading, Word Work and Literacy Centers.  It is a gradual release of responsibility from "I Do-We Do-You Do" frame of mind.  When done correctly it flows beautifully and your students will become successful, independent and happy readers and writers. I've been implementing balanced literacy in my classroom for 18 years, and I LOVE IT!!! 

In order to do Reader's Workshop correctly, you need to have a 60 minute block of uninterrupted time. 

Students Reading Independently 
It needs to happen daily and consistently. Here is a breakdown of my reader's workshop:

60 Minute Block:
Mini-Lesson- 5-10 Minutes (I DO)
This is when I read a mentor text and introduce our purpose for reading. 
Mini-Lesson Carpet Area 

You will need an author's chair, easel, big book stand, pointers and a basket of supplies (post it notes, markers, highlighters, wiki sticks, sharpies...) I keep my basket of supplies under my chair. It really helps me have everything available during my lesson. 

 Shared Reading, Interactive Reading 5-10 Min.
 (WE DO)
This is where my students participate in shared reading, interactive reading, and where they turn and tell what they've learned. I use my pocket chart a lot with cut up sentences and vocabulary cards. 

Students participating in Shared Reading

I alternate the "I Do" and "We Do" lessons each day, so it doesn't take so long. I teach ONE SKILL FOR THE WHOLE WEEK.
Here's a peek at my week:
M- Mentor Text, introduce the skill (I DO)
T- Anchor Chart, review skill (I DO)
W- Vocabulary Cards, review skill on pocket chart (I DO)
Th- Turn and Tell, Shared Reading (WE DO)
F- Interactive Anchor Chart, Interactive Notebook (WE DO)

Of course, you can mix this up and do it how it bests meet your students and your needs. It's so flexible!!!! Okay, next part...

Independent Reading/Interactive Notebook 30-45 Min. (YOU DO)

First students exchange and read their leveled books- they know their reading level because I test them once a month. My first graders know what level they need to be at by the end of the year. My library has leveled tubs where my students can find many, many titles in their level. They pick one new book every day. That is the same book that they take home to read at home and get signed on their reading log. 

Leveled Library 

After reading their book, they apply the skill into their schema notebook. Sometimes, I just have them read, to write and respond, or they glue in their interactive notebook activity. I switch it up. 
This is their schema notebook. They glue my anchor chart or vocabulary card on the "Teacher" side of their notebook, and then their activity on the "Me" side. In this lesson, we were finding adjectives in our own story about our character. 
Schema Notebook- Teacher Side with Anchor Chart and Student Side with activity

If you're interested in checking out my Reader's Workshop resource that includes Mini-Lessons, Vocabulary Cards, Interactive Notebooks and Mentor Texts, click here
Ok this is the tricky part... so here's when you really need a behavior management system in place. If you're interested in reading about how I manage my class click here  You got to have this in place BEFORE doing any of this, or you'll drive yourself crazy!!!! And, we don't want crazy teachers, we want happy teachers! LOL

Guided Reading Groups-2 per day (15 min. each) This is done during the time that the students the independent reading time. 
I have a peer facilitator who wears a cute hat that says "Ask Me". This is my star student of the week. He/she walks around to answer questions for me while I'm reading with my groups. This way, I'm not disturbed and the rest of the class can continue working/reading. My students LOVE this job! 

Peer Facilitator Hats

I meet with two guided reading groups per day. I have 5 groups with color names: Turquoise, Magenta, Tangerine, Violet and Jade. 
Here is how I meet with my groups:

Turquoise (low)- MTWTh
Magenta (middle low)- MWF
Tangerine (middle high) TTh
Violet-(high) F- by January these kiddos are with Jade group
Jade (high) TTh- These are my literature circles that meet by themselves. If you're interested on how I run my Literature Circles, click here

Here is a picture of how I organize my tubs for my guided reading books: 

Baskets are from Wal-Mart
 I use these Reading Strategies to help my students decode the words in their story. These are the posters that I use. They are on the wall behind my guided reading table. 


I use these templates for my guided reading groups and running records. 


I keep all of these templates in my guided reading binder with dividers for each group. I only take two running records a day. I do a warm read (familiar text) and a cold read (new text) every day. I may take a running record on the same child for both reads, or a different child. Typically I like doing the same child for both so it's easier for me to keep track. I use the MSV's in the side column to see what cueing systems my students are missing: 


Here is a break down of what I do during my guided reading groups:

1.) Familar Read (running record) Students read familiar texts from the days before as a warm up. 
2.) Pass out new books- ask a hook question for the new book- set purpose for reading.
3.) Picture Walk of new book- look at each picture and prompt the students of any tricky words. "If I saw the word ...... what would it start with? What would it end with?"
4.) Look at sight words/vocabulary words in the story they may stumble on. We frame the words, spell them, and clap the syllables. I already have these words made on my white board. 
5.) Students tell me which reading strategy they will be using before we start reading...I hold them accountable for it too. When they tell me their strategy, they need to show me the hand motions.
6.) Read new book- pass out pointers if needed. Stagger your students when they start reading so they are not all reading at the same time. Students keep reading over and over again until teacher holds up stop sign. They do NOT stop! 
7.) Take a running record on a cold read- new student every day.
8.) Hold up stop sign and students put their books in a stack.
9.) Teacher passes out Popsicle sticks with comprehension questions on them. Students read the question on their stick and answer one at a time.
10.) Word Work- students get magnetic letters and a magnetic tray to make any word they were struggling with during the story. This could be word families, sight words or hard vocabulary. If you're interested in checking out my Guided Reading resource, click here

There you have it! Remember, the rest of the class is still reading and working in their schema notebook. If they get finished early, they may read in their browsing box.  Inside these boxes are our Journeys decodable books and paper books that the students have made. They also have a diary that they can write in. 

Buddy Reading (5 Min.) -If you have time. 
This is where the students sit knee to knee and read part of their story to each other. I also have cards with comprehension questions on them. These are pictures of my students buddy reading after they were finished with their Research project on Endangered Animals.  If you're interested in check out my Endangered Animal Research and Writing resource, click here


I hope you got some great ideas about how to implement Reader's Workshop and Guided reading together. If you have any questions, please ask in the comment section below. I'm happy to help! 
Love, 
Kara 


Friday, July 14, 2017


                    My Writer's Workshop Block: Tips and Tricks

Have you wanted to start Writer's Workshop but don't know where to start? Well, hopefully in this post you get some new ideas and see my tips and tricks. Writing is my favorite subject to teach my first graders, so you're in luck! Just keep reading...here goes! 

Writer's Workshop is a part of the Balanced Literacy framework. It includes: Reader's Workshop, Writer's Workshop, Guided Reading, Word Work and Literacy Centers. 

If you want to do Writer's Workshop the correct way, you need to think about having a 60 minute block daily. Writing time needs to be consistent and sacred...that means it needs to happen every day! 

Here's what my block looks like broken down into 3 parts:
 I Do, We Do, and You Do.

I Do (mini-lesson) 5-10 minutes
We Do (turn and talk-interactive writing) 5-10 minutes
You Do (independent writing, conferencing) 30-45 minutes
Author's Chair- 5 min.

You're probably thinking...how can I get all of this in for 60 minutes? Well, you can alternate the I Do and We Do...that's what I do with my class. I teach one skill ALL WEEK LONG. The first day is a mentor text, the second day is vocabulary cards and anchor charts, the third day is interactive writing, the fourth day is review turn and tell and the fifth day is review with interactive notebook...you can do this in any order that you want! It's so flexible and that's why I love it so much! 

Here's some lesson plans that I've made for my Writer's Workshop mini-lessons. This is the "I Do" part of my block.  I love to read as many mentor texts as I can.
Lesson Plans with Mentor Texts, Anchor Charts and Vocabulary Cards

One of my favorite anchor charts to start writer's workshop is this one: Don't Know Where to Start? Just Write From Your Heart!
                    

The first week of school we brainstorm things that we can write about and my students cut out the anchor chart and glue into their schema notebook (reader's and writer's notebook). One side is the teacher side for anchor charts and the other side is for them. Here is an example of the "We Do" part of the block:
Schema Notebook is for anchor charts and interactive activities

I also use vocabulary cards. These are posters that I laminate and put on my pocket chart. After I teach the skill, then I put them on the bulletin board in my writing center.
I have vocabulary cards for parts of speech, grammar and the process writing. These are helpful for the students to see them in the writing center after the skills are taught. I also use them with my poetry center as well. Here is a picture of my poetry center with the vocab cards around the poem. If you're interested in my writer's workshop vocabulary cards, click here

Another example during the "We Do" portion of the mini-lesson, I call on students to come up to the pocket chart to read sentences, while the rest of the class has their interactive notebook page in their lap with their clipboard and pencil. They are copying what the student is writing or reading from the anchor chart or pocket chart. 


Student moving cards around to expand a sentence. 
Interactive Notebook Activity 
During the "You Do" portion of writer's workshop, is where the process writing takes place. My students use a poster with Popsicle sticks that they move down to show which step they are on. This helps them and me keep track of their progress.  Here is my poster. The kids LOVE it! When I pull this poster out, they all clap and cheer for writing!!! You have to tell your students that they are authors now and it may take them several weeks to publish their book because they have to go through all of these steps. You also need to refer to real authors and their process of getting a book published. Then they will understand. 


The students take part in the writing process using these steps: Brainstorming, First Draft, Student Conference, Proofreading, Teacher Conference, Editing and Revision, Final Draft, and Publishing. My students know that they can raise their hand at any time for me to spell a word in their dictionary. We make these dictionaries at the beginning of the year. If you are interested in checking out my dictionaries for writer's workshop, click here They keep their dictionaries in their writer's workshop folder. 


My students have a genre chart that gets put into their writer's workshop folder. This is where we color in the genres that my students can write. And...they cannot write the same genre twice. They have to write as many as they can! Here is the template that I made: 

We organize our folders with one side being a work in progress and the other side the finished product. You could also use colored stickers on each pocket: red for finished pieces, and green for works in progress. All the templates that the students do for each step, I stamp with the date and staple together. 

My students also know where they can get all of their papers for each step. I organize them inside a Banker's Box that I bought at Office Depot. This is one of the best purchases that I've ever done! 


My students also take part in teacher and student conferences. They know to sit at my small conferencing table and whisper during their conference so to not disturb the other students who are writing. 
At the beginning of the year you must MODEL, MODEL, and MODEL how to do a student conference successfully, because this will set the stage for the whole year. This is where they read their stories to each other and circle 8 misspelled words and check off their student conference checklist. 
Students taking part in a student conference

My students also sit at my horse shoe table to do a teacher conference. They sit and wait quietly until I can talk with them about their story. No matter what step they are on, they can always raise their hand to conference with me. It doesn't have to be teacher conference. When they do meet for teacher conference, they read their story to me and then we fill out the teacher conference template together. I give them suggestions, compliments and we talk about whats going to happen next in their process. 
                          

During final draft, the students are illustrating, writing, outlining, and perfecting their story getting ready to publish. I have different templates with pretty borders for them to choose from.  This is their favorite part of writer's workshop! They write one sentence on each page, but depending on how long their story is, they can write more than one. Aren't they beautiful??? 


After illustrating their cover page, title page, dedication page and author's bio, then we get to staple it altogether! 


Published Book...Ready to Read to the Class!

When they sit in the author's chair, then we all sit on the carpet and listen. We give compliments and suggestions to the author.
This is so exciting for the students and they look forward to reading to the class! 


Then they take the story home in a clear plastic folder with their first draft for the parents to see. I attach a letter on the front of their first draft that explains the whole writing process. The students sign their name at the bottom.
When the story comes back to school the next day, then we display them on our publishing wall! The students each have their own pocket that stays on the wall and when the new book goes up, the old one comes down to take home for good. Here is my publishing wall: 

If you are interested in checking out my writer's workshop resources, click here It includes my lesson plans for the whole year, anchor charts, mentor texts, vocabulary cards, interactive notebooks, photos, and writing templates. This resource can be adapted for grades K-3. I hope you got some great ideas about how to start Writer's Workshop in your classroom!
Happy Teaching! 


Love, Kara :)

Saturday, July 8, 2017


My Classroom Behavior Management: Tips and Tricks 

I LOVE a challenge... so when I have students in my classroom who are challenging behaviorally, I love to see how I can make them successful. My behavior management that I use really does the trick. I use bonus bucks that the students can earn for the treasure box. I have them in a basket sorted by color and each student has their own cup on their desk to keep their money in. 
Bonus Bucks Cup and Basket

How do my students earn their bonus bucks? I tell them they have to do three things: Listen, Follow Directions and Be Respectful. If they follow those three rules, they will get rich! But.... if they break a rule, then they have to owe me money in return. Every Friday we have treasure box time. Each student brings me their cup of money and at the beginning of the year, I help them count it, but by the end of the year, they can do it all by themselves. Each week the price for the treasure box changes. It goes up 5.00 every week. So, if they have the right amount of money, then they can go to the treasure box, but if they do not, then they cannot go and have to wait until the next week. This is truly a hard but real life lesson. It's amazing how much harder they will try the following week to earn more money just so they can go to my treasure box.

This Treasure Box is from Amazon.

Inside the treasure box are trinkets, toys, books, stickers, party favors, and stuffed animals. One of my wish list items at the beginning of the year is to have parents donate gently used toys for our classroom. This really helps us get a great boost for the first couple of months. I also try and keep it seasonal. So, when Halloween comes around, I have stuff that's Halloween fun.
My students can also earn their bonus bucks for turning in their homework, waiting quietly in the hallway, turning in home projects, being a secret walker, moving up to blue or purple, having the best interactive notebook, saying thank you when called on, sitting quietly and listening during a story, cleaning up their center or math workstation and our pack and stack race.
I have a star student every week who is my peer facilitator. They are in charge of answering questions for me during my guided reading groups. They also give out bonus bucks to the secret walker in the hallway. They get to wear these nifty visors that I got at Hobby Lobby. 
Peer Facilitator Hats

During reader's and writer's workshop, we have a Bravo Bird Contest. This is to earn bonus bucks for being the quietest table during our workshop time. The tables each have a colored bird that represents them: Red Cardinals, Yellow Goldfinches, Blue Jays, Orange Orioles and Purple Peacocks. I use a poster that lets me know which table was the quietest through out the day. If they are talking and not working, they will get a point on their bird. So, the peer facilitator will put a point for me on the poster. This is a great visual for the students to see which table is winning. If they have no points at the end of the day... they WHOLE table will earn bonus bucks.  If they have a point, they will have to owe me the bucks. This is a great accountability lesson in that we can all work together to achieve success. Here is my Bravo Bird Poster:
For each group of tables I have different jobs. I rotate a table captain weekly. The table captain is in charge of two things: Keep their table quiet and make sure they're working. This works really well during a Bird Contest because the captain is in charge of their table. Some captains do better than others because they want their money! I have another poster that I use with colored crayons to show who is captain for the week. Each student has these colored crayons on their desk. This way every student gets to be the captain many times during the school year. 

During the first week of school, we read the story "The Little Engine that Could". This story really teaches about growth mindset and believing in yourself. We talk about how we don't say "I Can't" in Mrs. Rickman's classroom. We say "I'm having trouble". This eliminates the feeling of self doubt and helps the students believe they can do anything they put their mind to. I have an anchor chart that I use for this lesson. We talk about how we are going to bury the word "Can't" and lay him to rest. The students think this is so funny, but it really connect with them. So, for the rest of the year, we DO NOT say can't. When someone accidentally slips and says "Can't", the whole class will gasp! LOL
I Can't Anchor Chart

This is my behavior chart that I use. The students all start out on green and then either move up or down from there. If they move up, they earn bonus bucks. If they move down, they will owe me bonus bucks. I laminate these cards and put them on my filing cabinet. I have colored magnets for each student with their magic number. This way I can reuse the magnets every year.
So, I saved the best for last... I never yell or scream at my students. I talk to them like we are adults. But, when they are talking, I stop and wait. They know that when I stop teaching, I mean business. We could have a heads down with the lights turned off and have a mini-lesson about listening. They hate this...so when I say "1", they all put their thumbs up and freeze. We practice this over and over again the first week of school until it is second nature. We also practice Mr. Clicker Attention Getter. This is my nifty little clicker that I use when we are doing workshop. I don't even have to make a sound, I just click it and the whole class will look at me. If I'm looking at a student they know they are the ones who were talking and will have a consequence. I don't sugar coat this technique. This will set the stage for when I'm doing guided reading and I want silence in the room.  Here is a picture of my clicker:
 
Okay, okay, you're probably laughing, but it really works! I used to use the frog clickers, but can't find them anymore. If you know where I can order some please let me know! LOL 
If you are interested in checking out my behavior management resource, click here I hope you have a wonderful school year coming up and let me know if you have any questions! I'm happy to help! 

Happy Teaching!
Love,
Kara 


Thursday, July 6, 2017


             My Organizational Tips and Tricks for the Classroom
                            
                       
I LOVE organizing my classroom and making it look cute! I'm going to share with you some of my tips and tricks that I've used in the past. I believe that the more organized you can be at the beginning of the year, the rest of the year will be a whole heck of a lot easier to manage. I've also noticed that my students pick up on my organizational techniques and then they also want to be like that. So, it not only helps me, but it helps my students learn how to be neat and organized to help them be successful. 

                               My Classroom Library:
I have colored tubs from Lakeshore that I labeled with foam letters. I organize my books from A-Z and by genres. I also organize my back to school books together on the book stand.  The students use the A-O tubs during reader's workshop and the genre tubs during center time.  If you are interested in checking out my Reader's Workshop Mini-Lessons, click here

If you're interested in my genre posters above my library, click here

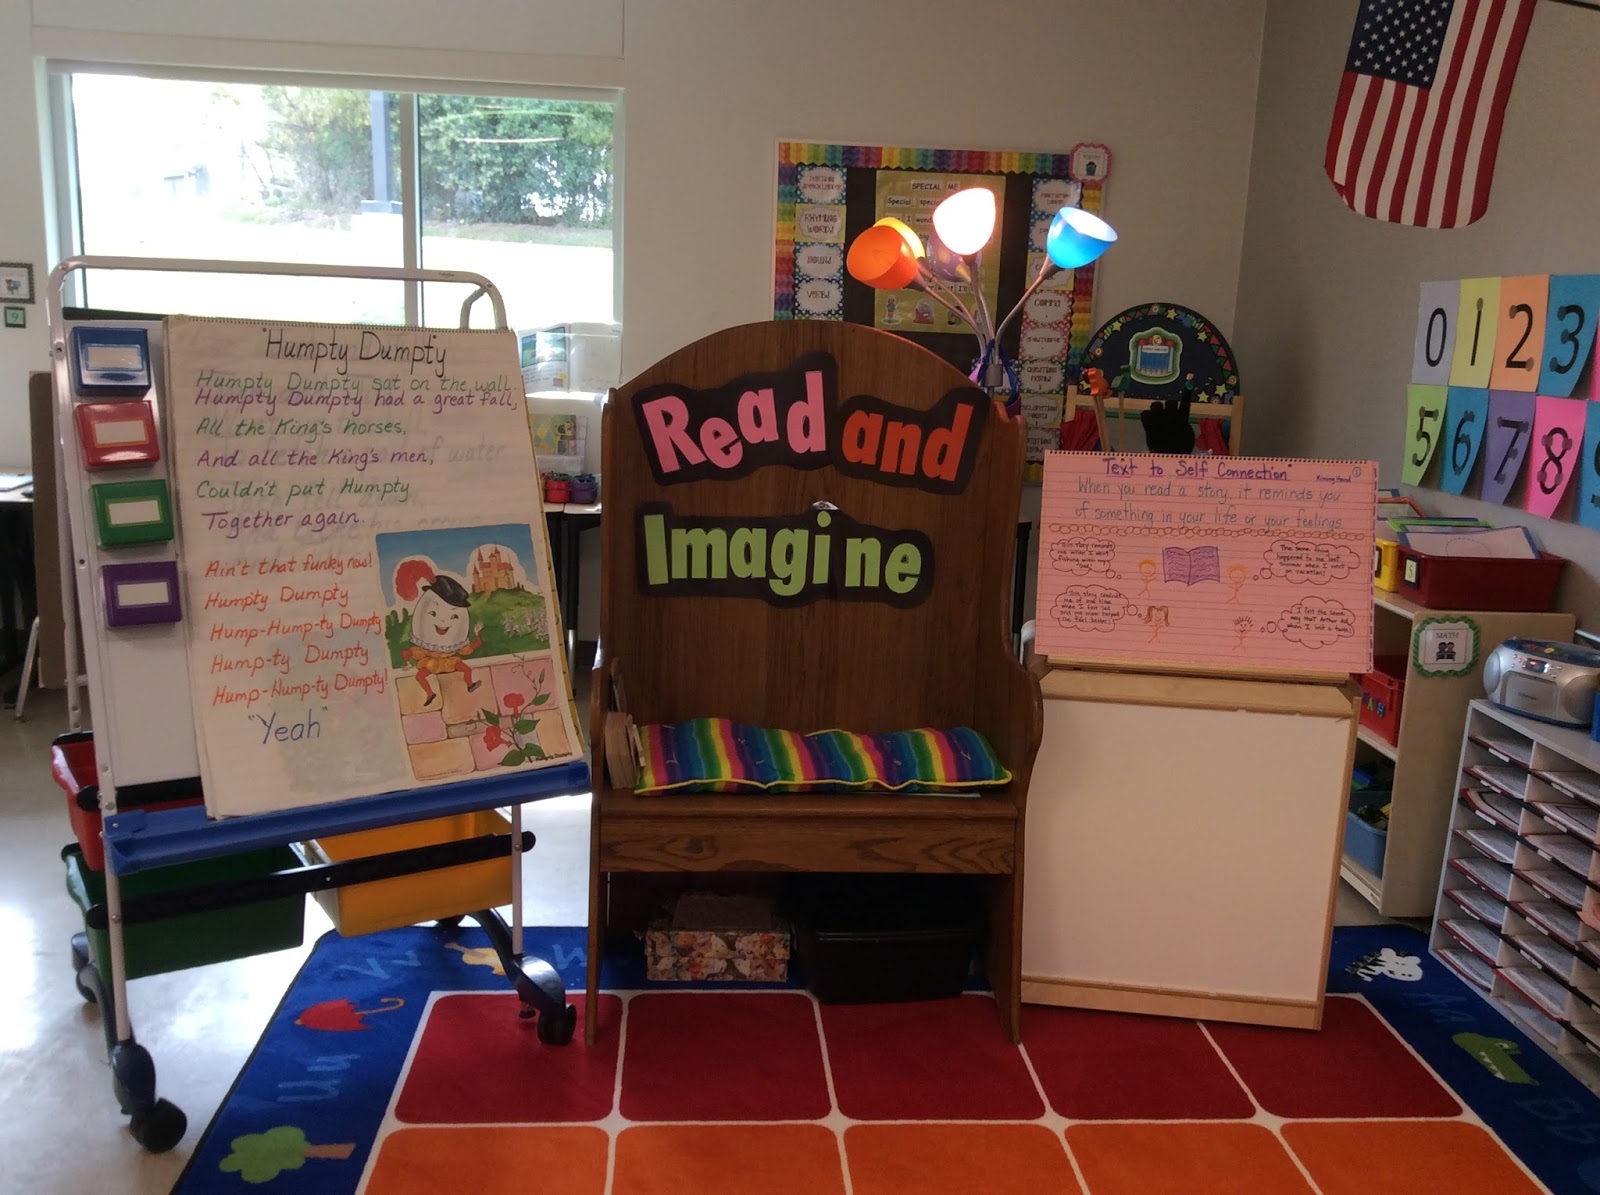
                         My Classroom Carpet Area:
I organize my read aloud/carpet area with an easel on one side, author's chair in the middle, and big book stand on the other side. On my big book stand, I have my anchor charts. On my easel, I have poems, expo markers, and pocket charts. Under my chair I keep my writer's workshop folders in a tub, markers, highlighters, oops tape, popsicle sticks with the student's numbers, pencils and sharpies. This way I can grab the supplies that I need immediately instead of having to get up and waste time finding my supplies. I use all of these supplies daily for anchor charts, interactive writing, calling on students and illustrating. When you are on a schedule, it helps to have everything handy and ready to go! This is one of my favorite places in my classroom...because this is where the magic happens! 


Author's Chair
These are my math work station tubs. I have them numbered from 1-8. I chose to keep them open at the top so I can easily take the materials out and put new ones in without having to open lids. I teach my students to organize these tubs before putting them away and I reward them with bonus bucks if they have the most organized tub. They love this and math workstations is one of their favorite time of the day. If you notice to the side, I have my math rotation board with the student's numbers on one side and the tub number on the other side. I rotate these numbers daily. I will go into more info about these later. If you are interested in checking out one of my math workstation games and activities for the beginning of the year, click here


This is how I organize my math games mats for guided math: 

This is how I organize my mentor texts: I have tubs that are labeled Reader's Workshop, Writer's Workshop and Math Workshop. Inside the tubs I have hanging files that are separated into skills. So, for Reader's Workshop, I have them separated into: Synonyms, Cause and Effect, Main Idea, Learning to Read...etc.
For Writer's Workshop I have the books separated into: Nouns, Verbs, Adjectives, Learning to Write.... etc.
For Math Workshop I have them separated into: Money, Place Value, Addition, Subtraction, Geometry... etc.
This is VERY helpful if I need to find a mentor text fast or if another teacher comes and asks me to borrow a book.  This method has saved me tons of time searching for books! If you're interested in checking out my Reader's Workshop mentor text list by genre and skill, click here If you're interested in checking out my Writer's Workshop mentor text list by genre and skill, click here
Mentor Text Organization
This is how I organize my writer's workshop papers. I got this awesome banker's box from Office Depot and it helps tremendously. I have each slot numbered with each paper the students need for writer's workshop. Whatever paper they need, I just tell them to get paper number 1 to 19, and they just know to look for the number without having to read. This really helps at the beginning of the year when not all my students can read well yet. I just LOVE this shelf! It has really helped with writer's workshop. If you are interested in checking out my Writer's Workshop Mini-Lessons, click here


Writer's Workshop Organization

                                        Guided Reading Baskets
This is how I organize my guided reading baskets. I have 5 groups that I meet with weekly. 
Turquoise: low
Tangerine: low middle
Magenta: middle
Violet: high middle
Jade: high 

This is how I organize my "I CAN" statements. I made these blank posters and laminated them so I can just erase the old statements with a tissue and write the new ones with an EXPO marker. I have them separated into subjects: Reading, Writing, Spelling, Math, Science and Social Studies. It also helps me stay on track with the skills and objectives that I need to cover for the week. 
If you are interested in these posters, you can click: here

"I CAN" Posters
This is how I organize my cubbies. Each student has a colored browsing box filled with books they have colored and put together. These tubs were ice boxes that I spray painted. I put a foam numbers and rainbow duct tape on the front of the box. The students know when they put the box away to make sure the number is on the outside. My students know that they can use their browsing box when they get finished early and need something else to do while they are waiting for everyone else to finish an assignment. This helps with them asking "What do I do now?" Also inside the cubbies I have their math tool box, clipboard, white board, and study carol. 
Cubbies with Browsing Boxes

This is how I organize my supplies at my guided reading table. I made a spinning caddie with materials from Hobby Lobby. I glued the pink plate onto a lazy susan, then glued the colored pails onto the pink plate. I separated my markers, pens, scissors, highlighters, pencils and sharpies. This comes in handy during guided reading and writer's workshop. I have all my supplies handy and the best part...it spins! 

Spinning Supply Caddie

This is how I organize my thematic units. I made cute cover pages for each one and separated them into binders. I have a big wardrobe closet that I keep all of my binders in. This helps me just grab the binder that I need to plan the upcoming unit.
If you are interested in checking out my thematic unit cover pages, click here

Thematic Unit Cover Pages

This is how I organize my published books for writer's workshop. I got magnetic pockets from Lakeshore and they work amazingly! Every time one of my students publish a book, they are displayed on this wall. They LOVE to see their work of art! 

Publishing Wall
This is how I organize my literacy and math rotation schedule. I rotate my math stations daily and the literacy centers weekly. The students can look at their magic number on the cards to see which tub or centers they will be going to that day or week. This also saves me time and headache. If you're interested in checking out my literacy center resource with I CAN cards, center templates and how to launch them at the beginning of the year, you can click  here You can also check out my You Tube video explaining what each picture is here

Classroom Centers and Math Workstations
Here are some of my favorite centers and how I organize them: 

Writing Center
If you're interested in checking out my writing center resource, click here. It includes templates and "I CAN" posters for: shape books, poetry, making a list, letter writing, postcards, my sticker story, my favorite holiday, my favorite letter of the alphabet, tiny moments and writing a how to story. You can also watch my You Tube video of my writing center: here

Theme, and Museum Centers

Science Center

Author Study

If you're interested in checking out my resource for a Kevin Henkes author study, click here

Poetry Center

If you are interested in checking out my Focus Poetry resource that includes poems and interactive notebook activities for every month and holiday, click here


Big Books, Geography and Finger Puppet Centers


This is how I organize my word wall area. I put it at eye level so when the students sit on the carpet, they can see it clearly! I use small clothes pins to put the words on the ribbons. I used black chevron ribbon and stapled them to the ABC circles. The students LOVE to help me put the words on here. If you are interested in checking out my word wall resource, it has the ABC circle cards and the first grade sight words with assessments. Click here


Word Wall 

Student Community Supples
This is how I organize my student's community supplies on their desks. I have glue, highlighters, small diaries, a mini broom, pencils, silver sharpies and hand sanitizer. 


Students' Materials and Supply Boxes
This is how I organize my students' supplies. I zip tied two crates together. Each student has a basket with all of their notebooks, folders and incomplete work. Their crayon box is also kept in the crate. The basket you see at the top of the crate is for work that gets turned in every day. 

Teacher Organization for Materials and Supplies
This is how I organize my weekly copies, mentor texts and supplies. I can find everything that I need quickly! 


This was my classroom on the first day of school. I hope you got some great ideas about organizing your own classroom for the fall! 

First day of school

Have an amazing school year! Happy Teaching!
Love,
Kara